FASTFOOT RESIDENTIAL INSTALLATION

Fastfoot® Fabric Footings

Ideal for forming footings:
  • Prevents ground water wicking up into the concrete
  • Uses minimal lumber (2x4s)
  • Protects lumber from concrete damage
  • Protects concrete from ground contamination
  • Protects water table from cement contamination
Fastfoot is manufactured in three widths, on 100' rolls:
  • FF50 - Narrow, 50", footings up to 18" wide, 11" deep
  • FF62 - Standard, 62" width, up to 24" wide, 14" deep
  • FF74 - Wide, 74" width, up to 36" wide, 14" deep
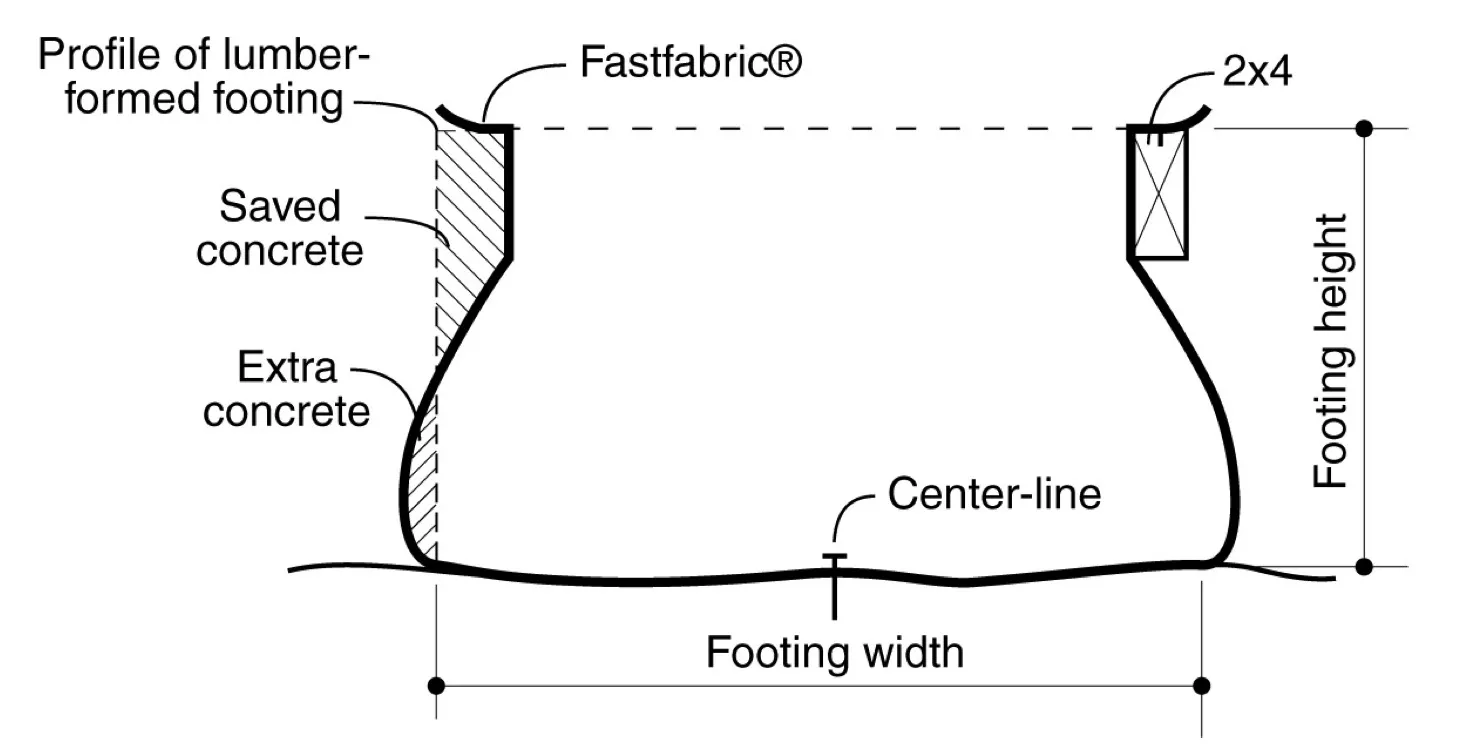
Fastfoot fabric footing cross-section

CALCULATING FASTFOOT® WIDTH

Fastfoot is manufactured in three widths, on 100' rolls:
  • FF50 - Narrow, 50", footings up to 18" wide, 11" deep
  • FF62 - Standard, 62" width, up to 24" wide, 14" deep
  • FF74 - Wide, 74" width, up to 36" wide, 14" deep
Minimum fabric width = footing width + 2 x footing height + 10" (for bulge and stapling area)

For deeper footings, use wider fabric. Where footing is too large for FF74, edge form each side of the footing and nail overlapping edges to ground (see below).

Note: if 'fabric height' is greater than 15", install a second 2x4 to reduce the bulge and fabric tension.

TOOLS & SUPPLIES

  • Sharp scissors
  • Hammer tacker with 3/8" staples
  • 2" sheathing tape
  • Hammer
  • Skill saw
  • Stake nails or screws,
  • Stakes (steel or wood)
  • 2x4 screed boards
  • 3/4" plywood for step fronts
  • 1x4s for cleats
  • Laser for setting screed board height on stakes

Adjusting Fastfoot®

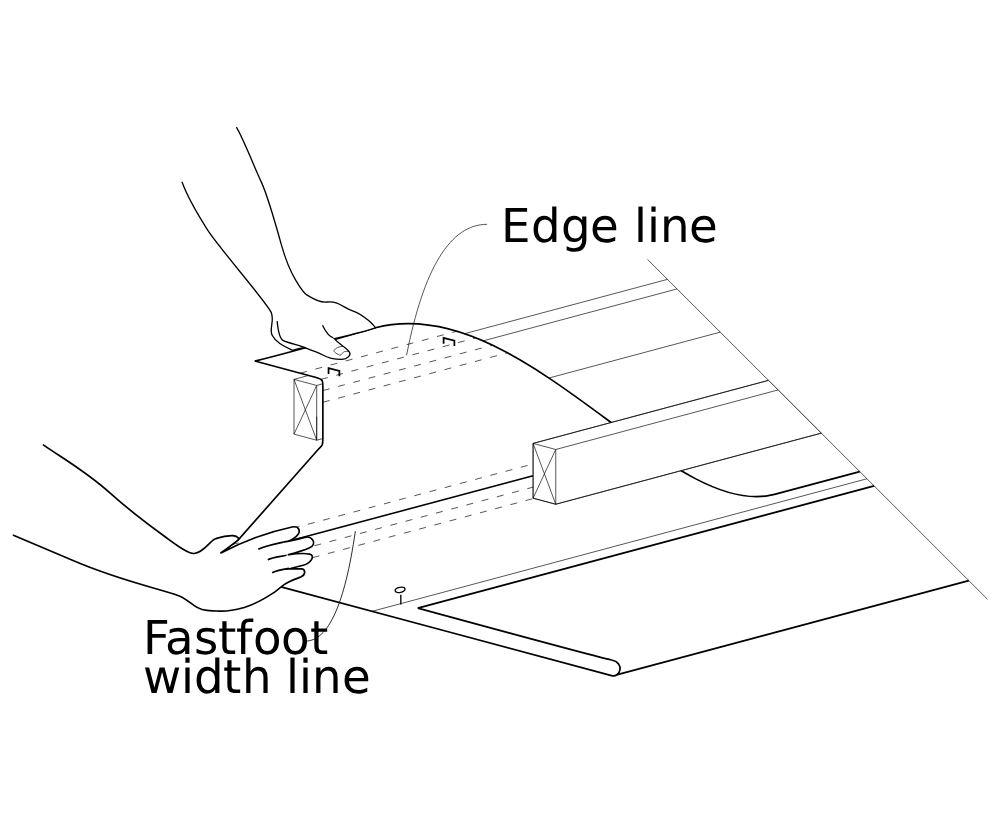
The magic of Fastfoot® is that the fabric can be used to form different footing depths. This is done by adjusting the fabric edge line on the top of the screed board as follows:
  • Place one hand on the correct 'Fastfoot width line' on ground and bring fabric edge snugly over the screed board. Hammer tack Fastfoot 6" on center to the top of the screed board.
  • Note the location of a colored 'edge line' with respect to the screed board under the fabric. Use this 'edge line' to position the fabric for stapling AS LONG AS the footing depth stays the same.
  • If the footing depth increases, let the fabric OUT by placing hand on the same 'width line' and note the new edge line over the screed board.
Adjusting Fastfoot<sup>®</sup>

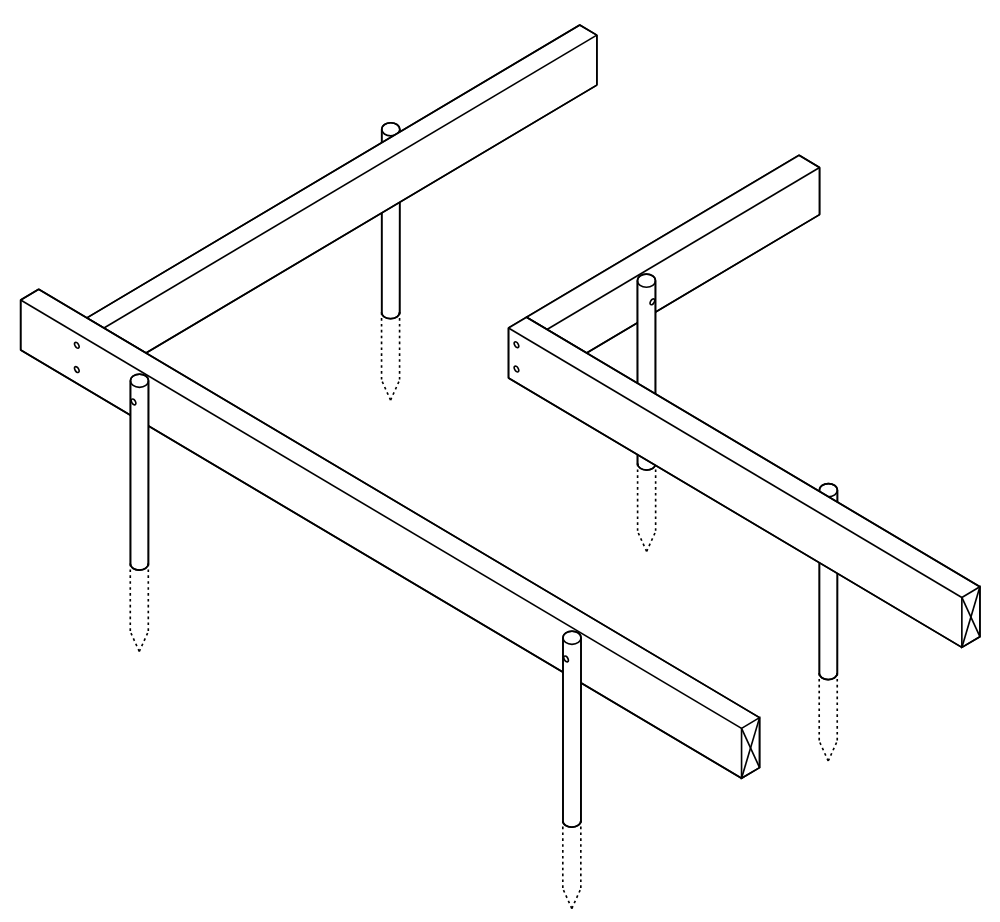
Install Screed Boards

Layout the outside footing stakes (steel or 1x4s) around the perimeter using a string line. Drive the stakes on this line about 6" on center. Reduce spacing for deeper footings or if the ground is less dense.

Drive inside stakes opposite each outside stake using a 1x2 cut to footing width. Top of footing is 3" less than the footing contact width (see diagram above right).

SOLIDLY ATTACH SCREED BOARDS

With fabric, lateral forces are reduced by 75%, but downward tension is increased. Use 2 angled nails or 1 screw per stake.

Install Screed Boards

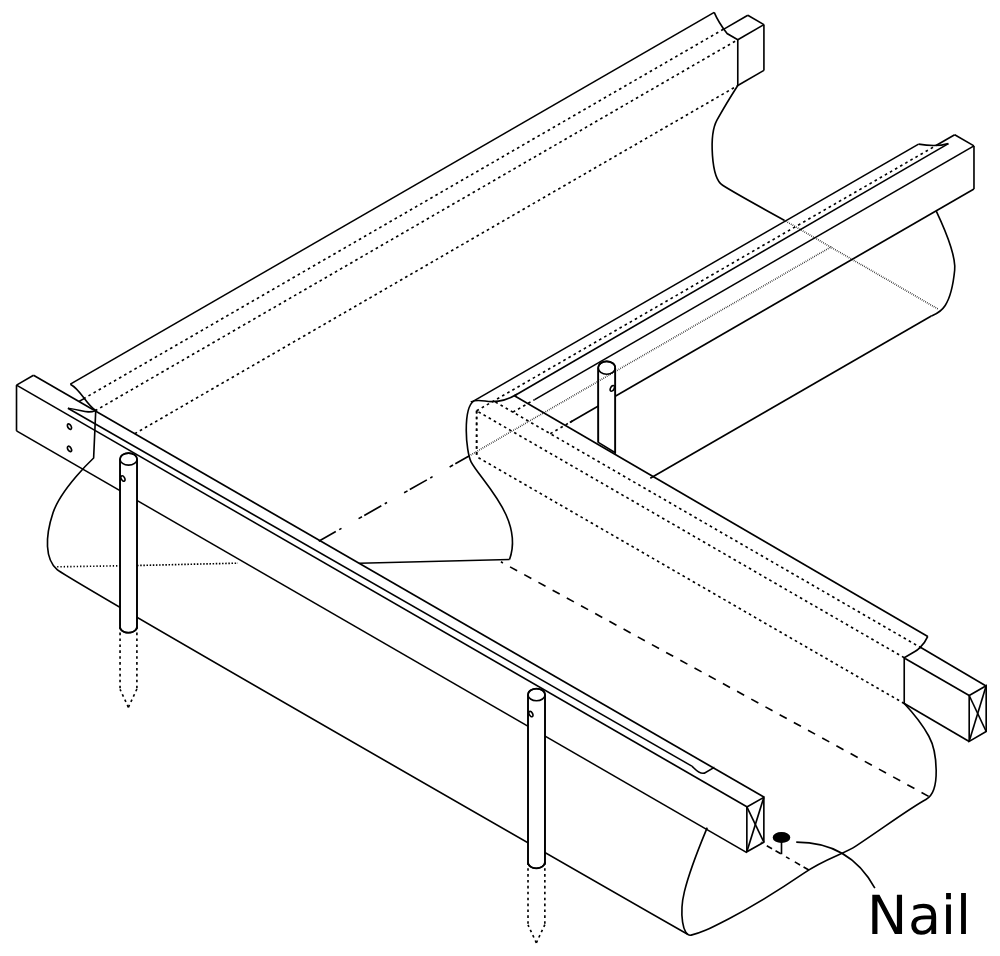
Install Corners

Using the edge line as determined above, staple corner edges to top of screed boards 6" on center. (See Fastfoot® pre-sewn corners)

If sewn corners are not available, run fabric 16" past corner, cut and staple in position. Use scissors to trim on inside of corner. Continue in new direction. (View the Folded Corners page for details)

Install Corners

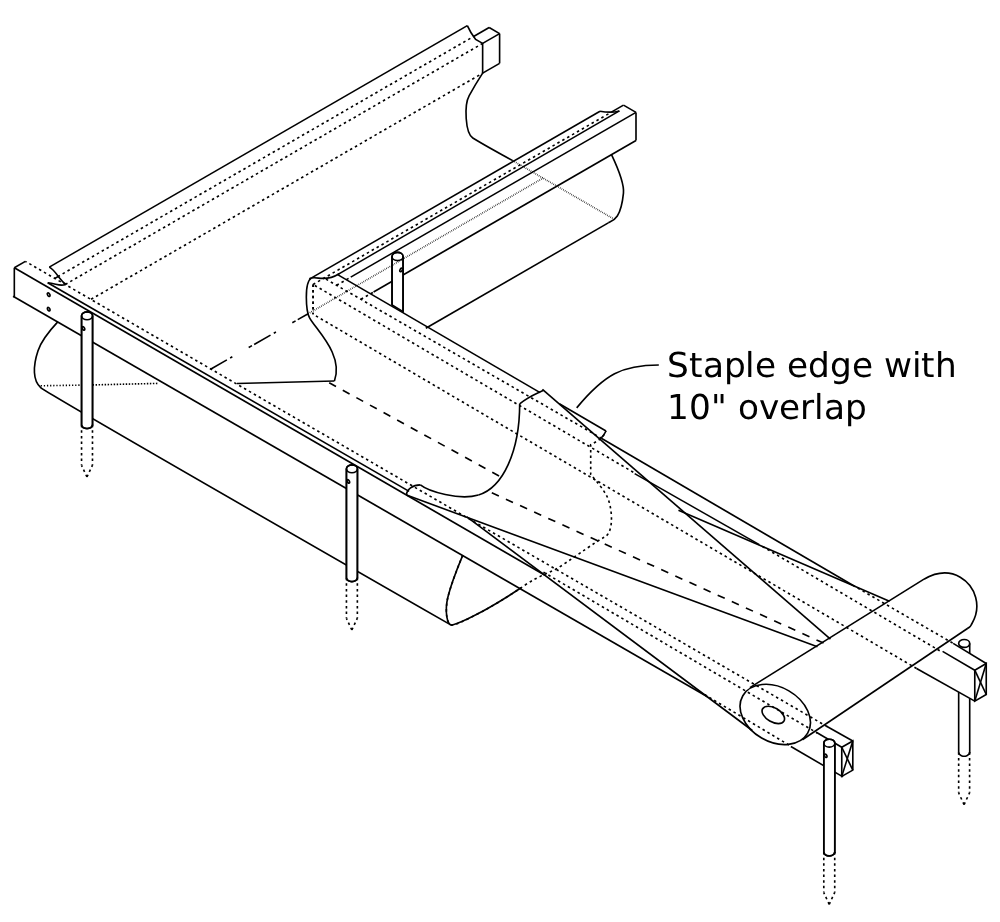
Install Fastfoot® Straights

Hammer tack the two Fastfoot® edges on top of the corner fabric with a 12" overlap. Unroll past next corner and cut with a 12" overlap. Hammer tack both edges 6" on center using the predetermined edge line.

Nail center line to prevent movement by wind and concrete. Use sheathing tape on overlaps and nail holes to prevent concrete escaping and moisture entering footing. If the ground will not support nails, use bricks or stones.

Install Fastfoot<sup>®</sup> Straights

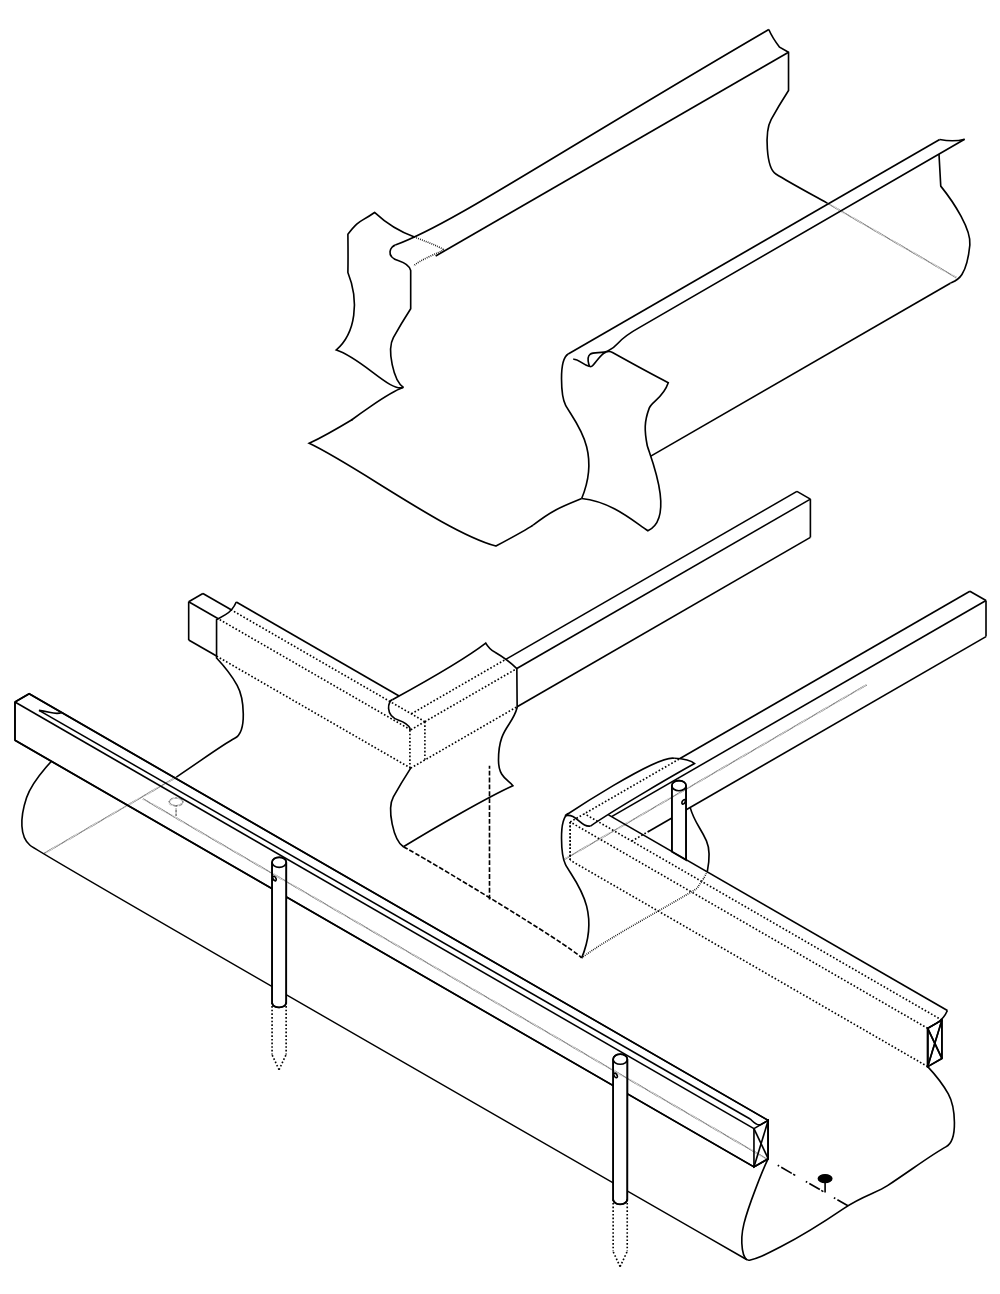
T-Junctions

Run fabric through junction. Cut an 'inverted T' in junction area with lower cut along footing width line. Fold and staple tabs. Run intersecting fabric into junction allowing a 12" overlap. Cut overlap along footing width line, and staple overlapping tabs to screed boards.
T-Junctions

Steps

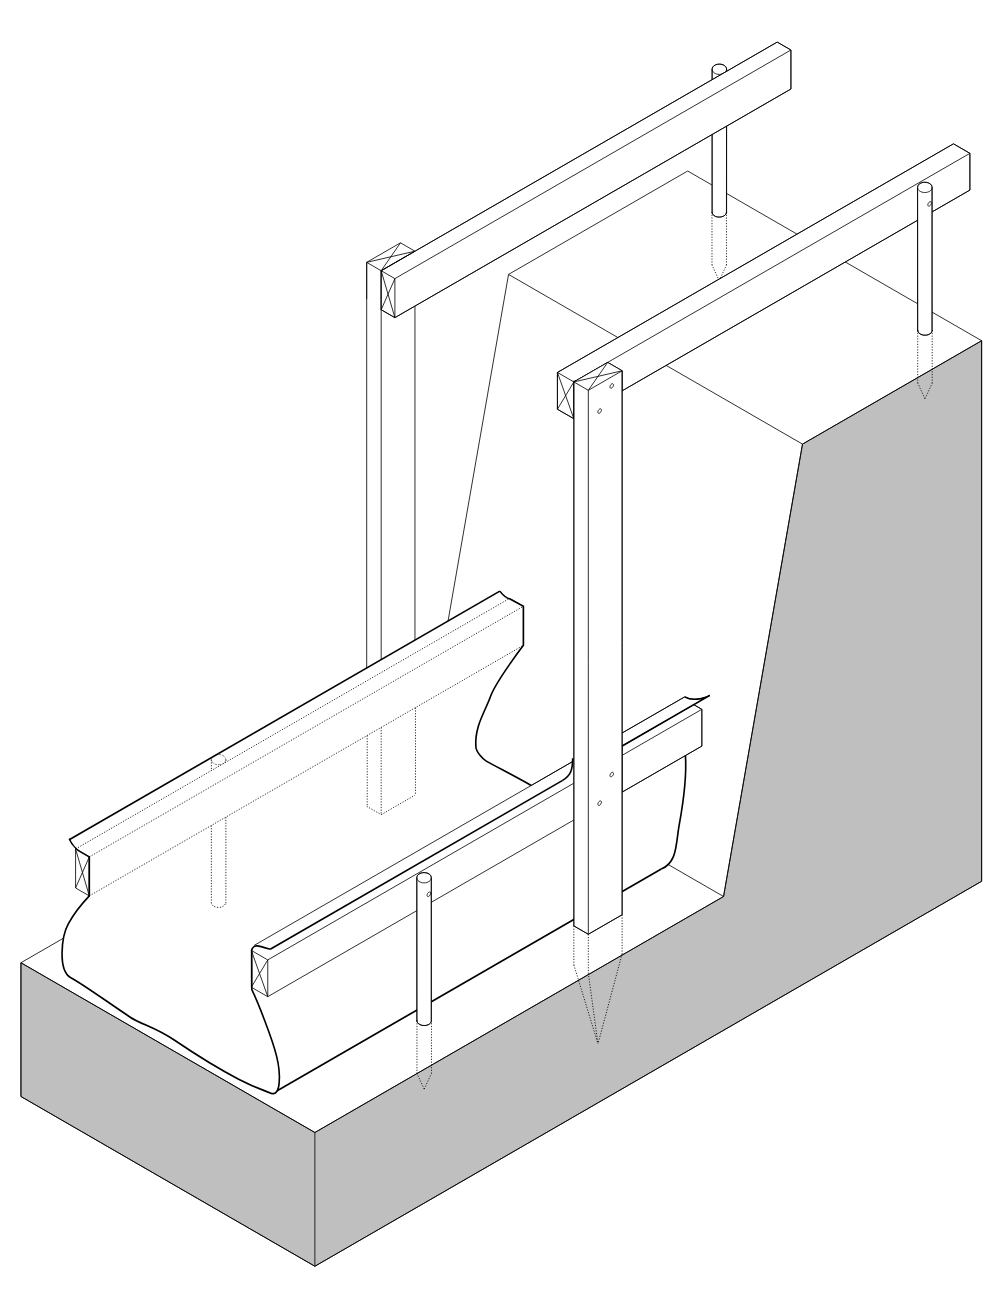
  • Drive pairs of 2x4 stakes into the ground and screw to upper and lower screed boards. Trim upper screed boards flush with vertical stakes. Drive additional stakes if the distance between the stake and bank is greater than 15". Install lower level fabric.
    Fastfoot step 1
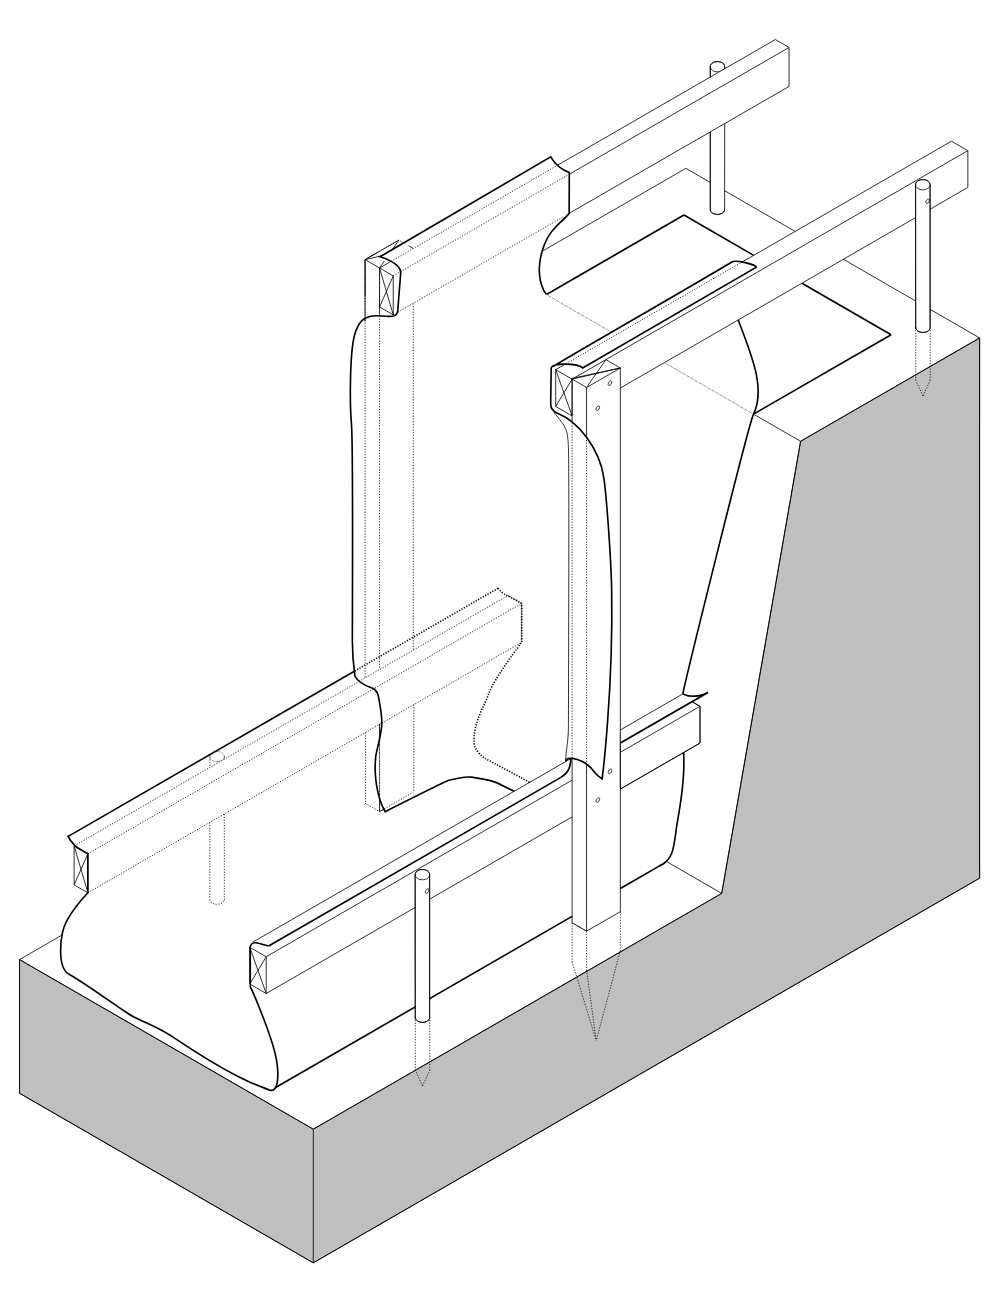
  • Run fabric up bank to form step. Most steps are too deep to form with a single fabric width. Either run two widths of fabric as edging or turn the fabric 90 degrees to obtain the required width.
    Fastfoot step 2
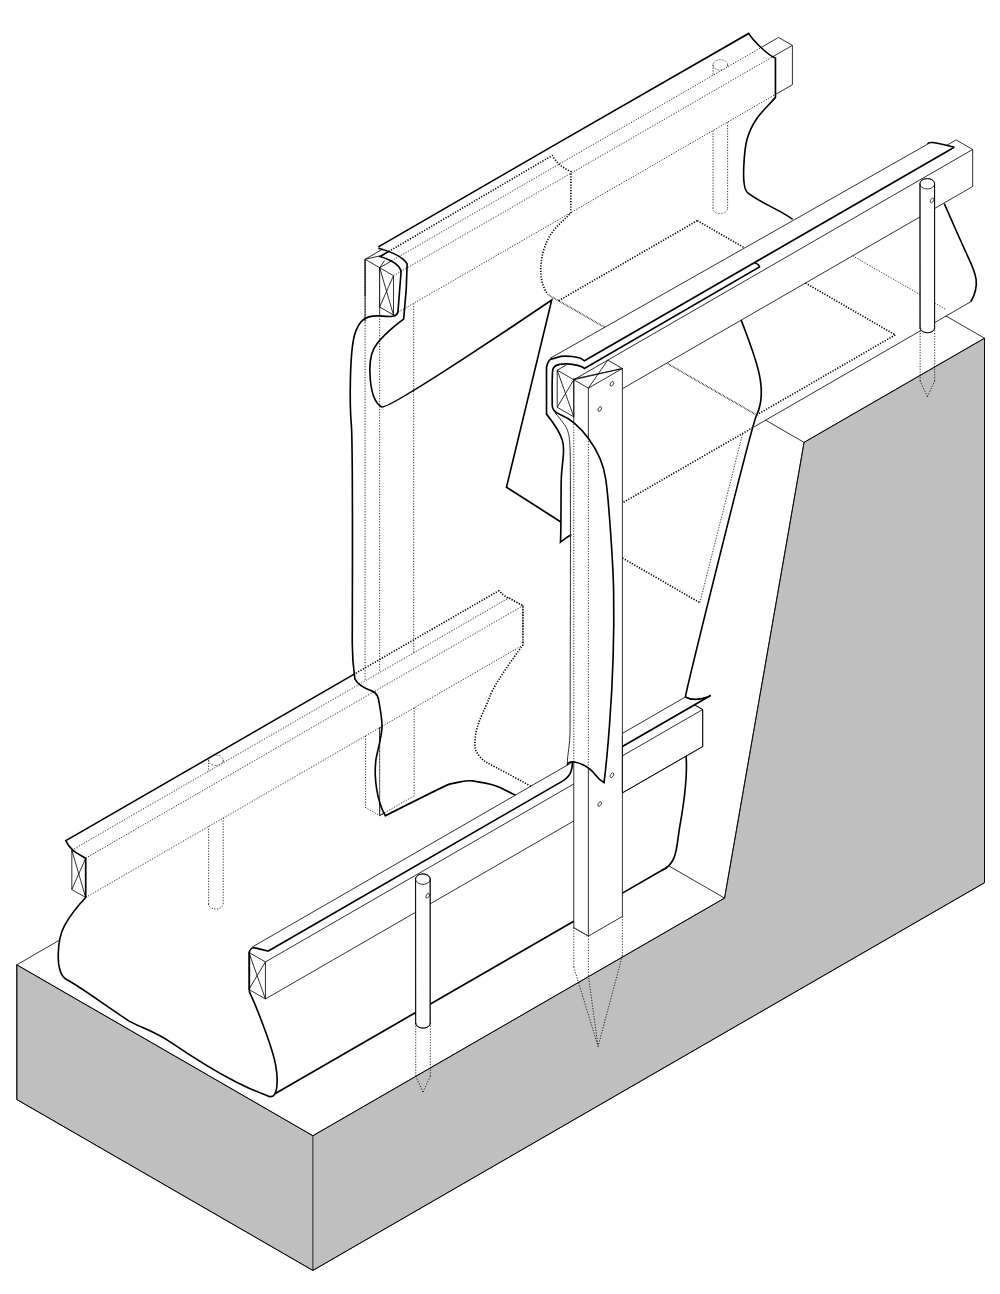
  • Install upper level fabric as shown. Cut fabric on the footing width line, letting center portion hang down bank.
    Fastfoot step 3
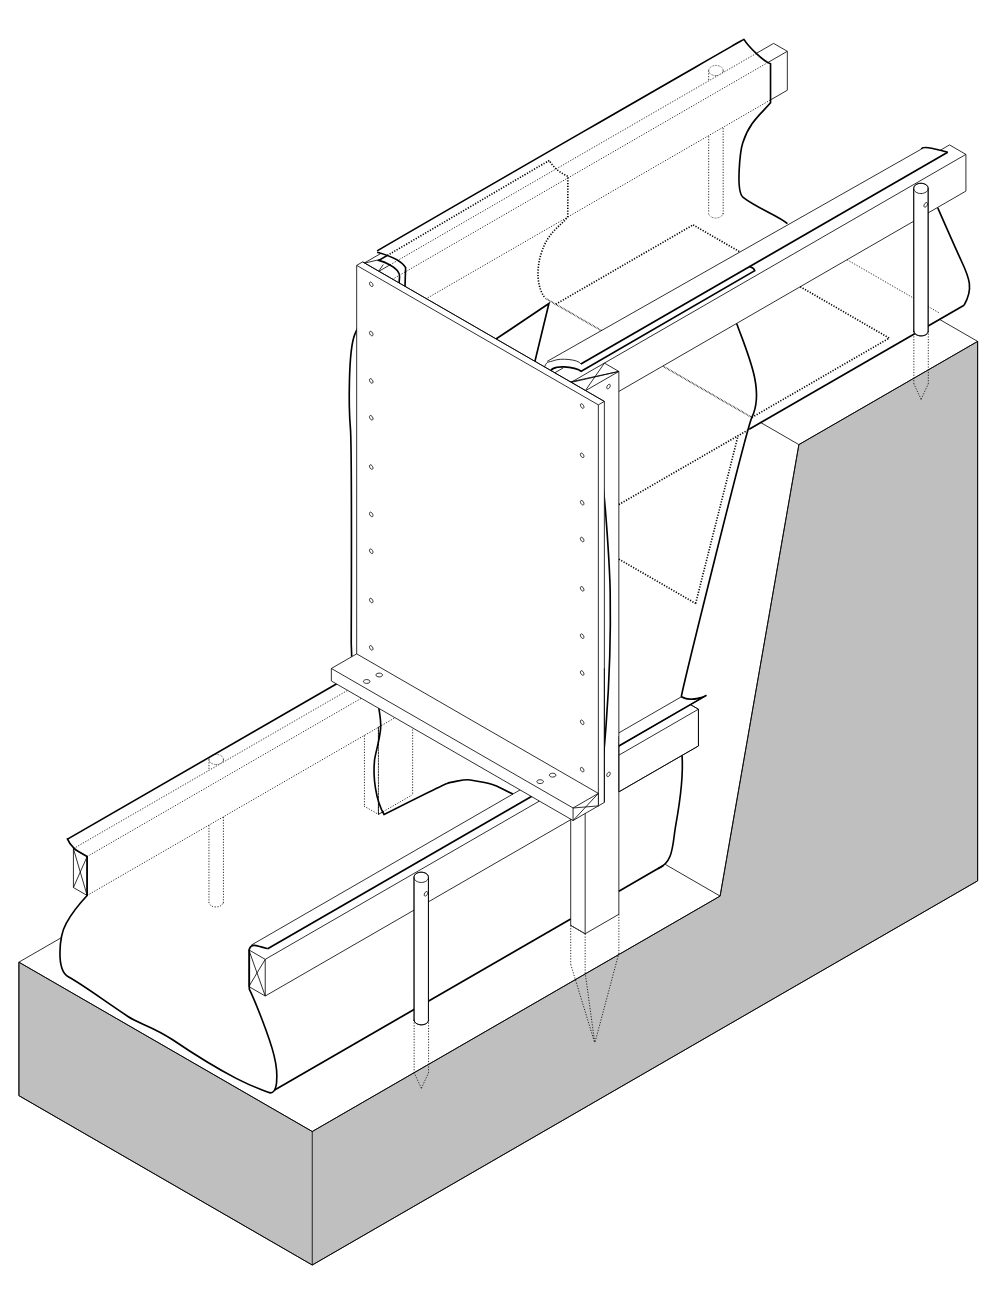
  • Screw plywood on bulkhead in position and brace as required. Ready for concrete.
    Fastfoot step 4

Vibrating Concrete in Fastfoot

Vibrate as you would any footing — Fastfoot is designed for it. Both internal poker vibrators and external form vibrators have been tested with the fabric at standard amplitudes and frequencies. Concrete consolidation is not compromised, and the fabric retains full integrity throughout the pour. Read the vibration test results and the theory behind why it's safe →